I thought it would be fun to share one of my earliest React projects - an ingredient picker I built during my internship back when class components were still the hot thing. While hooks and functional components are the way to go now, I think there's value in sharing this journey. Plus, who knows, you might still run into class components in legacy codebases.
I thought it would be fun to share one of my earliest React projects - an ingredient picker I built during my internship back when class components were still the hot thing. While hooks and functional components are the way to go now, I think there's value in sharing this journey. Plus, who knows, you might still run into class components in legacy codebases.
Here's some quick demo!
The Project: What Was I Building?
As an intern, I was tasked with creating a multi-select form component for a specific business problem. Due to confidentiality concerns, I can't share the actual use case, but I later adapted the component for a similar, more shareable purpose - managing recipe ingredients. It's a great example of how components can be repurposed! Think of it as a nested category picker where you could:
- Browse through ingredient categories (like vegetables, meats, etc.)
- Select multiple items
- See descriptions for each ingredient
- Get a nice
JSONoutput of your selections
Technical Context (aka "It Was 2021...")
When I built this:
- Hooks weren't the norm yet
- Class components were still widely used
- Create React App was our go-to bootstrapping tool
- Everybody still loved Bootstrap for their go-to UI Framework!
TIP
If you're interested in learning more about the implementation details, check out the full project repository on GitHub
Overview of the implementation
The component's interface is thoughtfully divided into two main panels that work together seamlessly. On the left panel, users can browse through all available items from our JSON data source. Items are neatly organized into expandable accordion sections, making it easy to navigate through different categories. When users find an item they want, they can simply click on its card to select it.
The right panel serves as a dynamic summary view, displaying all currently selected items. Users can easily manage their selections here – removing items with a quick checkbox click or jumping to a specific category in the left panel by clicking on its label. It's a simple yet effective way to keep track of what you've chosen.
The two panels work in harmony - as you make selections on the left, they immediately appear in the summary on the right. Think of it as your shopping cart while you browse through a catalog. This intuitive design makes it easy for users to build and refine their selections without losing track of what they've already chosen.
Here's my original implementation using class components.
class FormSelection extends React.Component {
  constructor(props) {
    super(props);
    this.state = {
      formListing: [],
      selectedForms: [],
      expanded: [],
      activeKey: "",
      showModal: false,
      jsonListing: [],
    };

    // Remember having to bind everything in the constructor? 😅
    this.setCheckAll = this.setCheckAll.bind(this);
    this.onCheck = this.onCheck.bind(this);
    this.handleShow = this.handleShow.bind(this);
    // ... and many more bindings!
  }

  // Good old lifecycle method!
  componentDidMount() {
    const formList = formListingData.map((item) => ({
      ...item,
      isOpen: false,
      checkAll: false,
      children: item.children.map((elem) => ({
        ...elem,
        isCheck: false,
      })),
    }));

    this.setState({ formListing: formList });
  }

  // One of many state update methods
  setCheckAll = (formCategory) => {
    this.setState((prevState) => {
      const formsList = [...prevState.formListing];
      // Complex nested state updates... 🤯
      return { formListing: updatedFormList };
    });
  };

  render() {
    const { formListing, selectedForms, expanded } = this.state;

    return (
      <div className="form-selection">
        <Row>
          <Col lg={8}>
            <FormsListing
              activeKey={this.state.activeKey}
              setCheckAll={this.setCheckAll}
              formListing={formListing}
            />
          </Col>
          {/* More JSX... */}
        </Row>
      </div>
    );
  }
}
What I Learned About State Management
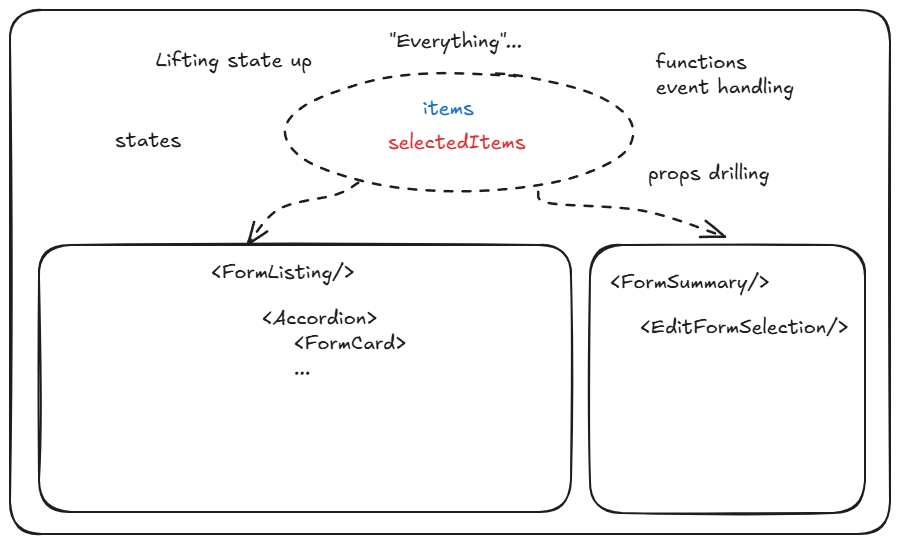
Looking back at this project, the biggest learning curve was understanding how to manage state between components. I drew this little diagram (shown above) as I'm reviewing this project again, and it taught me some valuable lessons about React's data flow:
1. State Lifting Was Eye-Opening
When I first started, I had state scattered everywhere in each component. I quickly learned why lifting state up is super important concept in React world. Having items and selectedItems at the top level made everything so much clearer – though getting there involved plenty of head-scratching moments...
2. Props Drilling: The Reality Check
See those arrows in the diagram? Each one represents props being passed down. At first, I thought "No problem, I'll just pass everything through!" Several hundred lines of code later, I understood why prop drilling is considered a pain point. This experience later helped me appreciate why we have state management solutions like Redux or Context API.
3. Component Communication
Getting the <FormListing/> and <FormSummary/> components to talk to each other was a journey. Every time the user selected an item, both components needed to update. This taught me a lot about parent-child component relationships and how state updates trigger re-renders.
4. Event Handler Nightmares
Remember all those .bind(this) calls in the constructor? Yeah... I spent a whole afternoon debugging why my event handlers weren't working, only to learn about the importance of binding in class components. Today's arrow functions and hooks make this so much simpler!
Looking at this code and diagram now makes me smile. It represents that "aha!" moment when I finally understood how React's data flow really works. Sure, the implementation wasn't perfect, but these lessons formed the foundation of how I think about component architecture today. What I learned besides React is that real-world isn't like tutorials or documentation examples are neat and tidy.
How I'd Do It Differently Now
If I were building this today, I'd:
- Use functional components with hooks (goodbye
this.setState!) - Add TypeScript from the start
- Use a proper state management solution,
Zustand/Redux
Why Share This Now?
While this code might be considered "dated" by today's standards, it represents an important part of my learning journey. Plus, understanding class components is still valuable - especially when working with legacy codebases or maintaining older projects.
TIP
If you are starting out learning React, I highly recommend you check out their official documentation!
Final words
Looking back at this project makes me realize how far I've come, but also reminds me how important those early learning experiences were. Whether you're just starting with React or looking back at your own journey, remember: everyone starts somewhere!
This post is part of my "Learning Journey" series where I share experiences from my development career, including the not-so-perfect parts!